Instructions for Adding Subtitles for Video Clips
Contents:
- Useful Tools You May Need
- Step by Step Instructions for Using MAGpie + Quicktime, (and maybe Super) to make subtitled Videos
- Step by Step Instructions for Using InqScribe (and maybe Quicktime) to make subtitled Videos
- Coming Soon...step by step instructions for using Windows Movie Maker to make subtitled videos
Useful Tools You May Need:
- Transcribing Programs
- Transana a great program for transcribing and organizing lots of video data. Download old versions free or new verson for about $50.
- InqScribe another great program for transcribing, also makes subtitled videos. Download free trial, or full version for about $100. Students get discounted price of $39, but it takes a couple of days to process your proof of student-hood.
- Subtitling Programs
- MAGpie a free program for adding subtitles to Quicktime videos.
- Inqscribe a great program for transcribing, also makes subtitled videos. Download free trial, or full version for about $100. Students get discounted price of $39, but it takes a couple of days to process your proof of student-hood.
- Video Conversion Programs
- Any Video Converter a free program for converting video formats, including .mp4 .WMV and .AVI
- there is a free version for mac, but it is well hidden on the site :) It's the second to last one down on this page: http://www.any-video-converter.com/mac-software.php
- Super ( http://www.erightsoft.com/S6Kg1.html )a freeware program called SUPER, which converts to and from a huge number of file types, including mov, avi, and wmv.
- Video Viewing/Editing Programs
- Quicktime Pro a $30 version of quicktime that greatly enhances editing options. I think regular old free QuickTime should work too though.
- Windows Movie Player a free player of .WMV files
- Windows Movie Maker free editing software for .WMV files, including a way to make subtitled videos (although its a bit cumbersome)
Step by Step Instructions Using QuickTime, MAGpie, and Super ($free but a bit involved)
Step 0: Format Your Video
0.0 You just want to make sure your clip is in a format playable by QuickTime. For example, if your movie is a .wmv, you'll want to use Super to convert it to .avi, .mov, .mpg, or .mp4 to be able to open it with QuickTime.
0.1 To open Super, right click on the icon and Run as Administrator. (this may just be a Windows Vista thing)
0.2 When Super is open, right click anywhere to add your movie and set the output folder where your converted movie will go.
0.3 Choose your settings and hit the button to Convert. In the picture, you can see the settings I use. It looks complicated, but the only things you'll want to touch are drop down menus for the [1. Outpout Container] and [2. Output Video Codec]. If it doesn't work make sure your video size and frame/sec are consistent with your original movie.
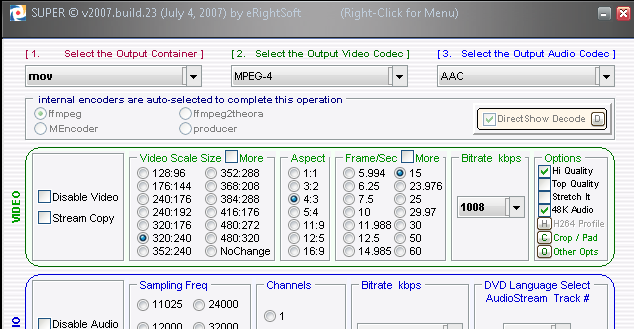
Figure: My settings for converting a .wmv movie to something playable by QuickTime. Video Size: 320x240, frame/sec 15
Step 1: With MAGpie, start a new project.
Step 2: Import the video file into MAGpie.
Step 3: Import the transcription into MAGpie.
3.1 You can simply copy and past your transcript text into MAGpie. If it's not in the right format, you'll have to manually move the text around to each box, but...
3.2 If you are in the know, you can make sure your text automatically organizes itself into each proper box...
3.3 If you want more details, there are some here.
Step 4: Set the time codes for your Captions
4.1 Using MAGpie to play the movie, press F9 to put in the times at which you want the captions to appear on screen.
4.2 If you want more details, there are some here.
Step 5: Output caption file
5.1 Ouput by choosing the EXPORT drop down menu and choosing QuickTime - SMIL 1.0.
5.2 If you found that you want to change your captions, no worries...just fix and export again and the old ones will be overwritten.
5.3 If you want more details, there are some here.
Step 6: Save Your Captions as a QuickTime movie
6.1 Open your QuickTime player (version 4 or higher)
6.2 Open your captions as a movie by choosing Select File > Open File... and make sure you are set to see All Files (*.*), see picture below
6.3 Inspect your captions. They should play like a movie. You can go back to MAGpie, change and re-export them if you don't like them. Otherwise, choose File > Save As... to save your captions as a QuickTime movie.
6.4 If you want more details, there are some here.
Step 7: Add Your Captions to your Original Movie
7.1 Copy the quicktime movie of your captions by selecting Edit > Select All, then Edit > Copy. Hitting Ctrl + A then Ctrl + C should work too.
7.2 Open the quicktime movie that you would like to add captions to. Make sure the time cursor is at the very start of the movie.
7.3 Choose Edit > Add to Movie or hit Ctrl + Alt + V to add the captions to your movie.
7.4 If you want more details, there are some here.
Step 8: position the captions within your quicktime movie.
8.1 The captions will initially be at the top of your movie. To change this, hit Ctrl + J, or go to Window > Show Movie Properties.

8.2 Click on text track, then click the Visual Settings tab

8.3 Changing the "offset" moves the text box around. if your movie is 320 x 240, choose the offset 0 x 240 to put the text at the bottom.

Step 8: SAVE your captioned Quicktime Movie.
8.1 I generally Save As... movieName_captioned just to remind myself.
Step 9: Enjoy your captioned QuickTime Movie!
![]()
![]()
Step by Step Instructions Using QuickTime, and InqScribe: (much easier but not free)
Step 0: Format Your Video
0.0 You just want to make sure your clip is in a format playable by QuickTime. For example, if your movie is a .wmv, you'll want to use Super to convert it to .avi, .mov, .mpg, or .mp4 to be able to open it with QuickTime.
0.1 To open Super, right click on the icon and Run as Administrator. (this may just be a Windows Vista thing)
0.2 When Super is open, right click anywhere to add your movie and set the output folder where your converted movie will go.
0.3 Choose your settings and hit the button to Convert. In the picture, you can see the settings I use. It looks complicated, but the only things you'll want to touch are drop down menus for the [1. Outpout Container] and [2. Output Video Codec]. If it doesn't work make sure your video size and frame/sec are consistent with your original movie.
Figure: My settings for converting a .wmv movie to something playable by QuickTime. Video Size: 320x240, frame/sec 15
Step 1: With InqScribe, start New Document.
Step 2: Import Quicktime media file
Step 3: Import the transcription into InqScribe.
3.1 You can simply copy and past your transcript text into InqScribe. Text editing is easy & intuitive.
Step 4: Set the time codes for your Captions
4.1 Go to Edit > Insert Time, or press Ctrl and ; to insert the current time.
Note: you can go to Edit > Edit Shortcuts to define your own shortcut for this function, and many others.
Step 5: Save Your Document as a Captioned QuickTime movie
5.1 Go to File > Save as Subtitled Quicktime Movie and a dialogue box will open
5.2 You don't generally have to touch any of the settings. Click Save As... button to name your movie file. (I use movieName_captioned to remind myself it's captioned.)
5.3 Checking the box for Save as Self-Contained Movie will make sure the movie works even if the original uncaptioned movie file is moved or lost.
5.4 It's recommended that you check the "Use Unicode" box if the movie will be playing on different kinds of operating systems.

Figure: Dialogue box for Save as Subtitled QuickTime File
Step 6: Enjoy your captioned QuickTime Movie!
6.1 Your movie is ready to be embedded in a presentation, emailed, and played by anyone who has QuickTime!
Step 7 (optional): embed your captioned movie into PowerPoint.